How To Create A Transparent Background In Photoshop

You may want to create a transparent background in Photoshop on your photos often times as this gives you a wide opportunity to bring changes in the visual appearance. For example, you may want to remove the background of an object or product to place it on your advertisement or other graphical works for eCommerce campaigns. Also, you may want to change the background so that the product is in perfect contrast with the colors and theme of your website. Also, logos, icons, and other graphic elements need to be placed on a transparent background so that they can be placed on any background at any time.
In this tutorial, we will show you how to create a transparent background in Photoshop using Magic Wind, Eraser, and Pen tool. To remove the background and make it transparent, first, open the image on Photoshop from File>Open. For this example, we will use the image of a headphone with a few balls around and having a yellow background.

1. Unlock the background and create a duplicate layer
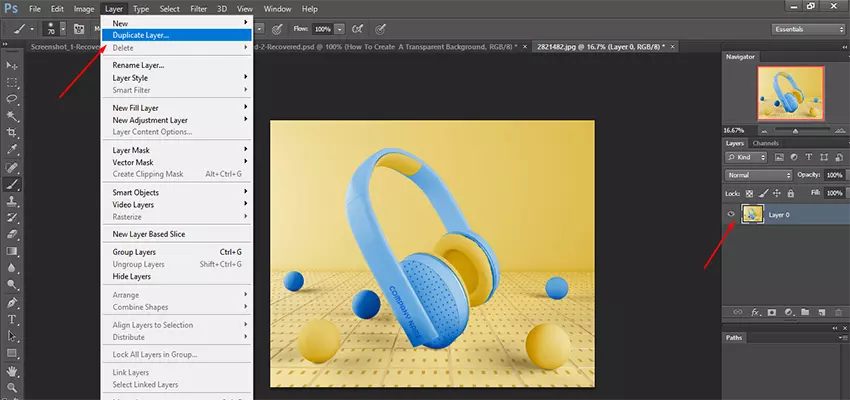
From the Layers panel, double-click on the background layer. A ’New Layer’ dialogue box will open asking you to change the layer name. For the time being, you can set it at default. Your background layer is now unlocked, anything deleted from this layer will be transparent. To change anything from the background layer, you should make a copy of the layer. Go to the top menu and click Layer>Duplicate to duplicate the layer. A new duplicate layer will be created, you should make your edits on this layer.
2. Make selections using the Magic Wand tool and delete the background.
Select the Magic Wand tool from the toolbar on the left-hand side of the window. The Magic Wand is an excellent tool in Photoshop to make selections. Just click and drag on the parts of the background you want to remove. Once you made the selection, press Delete or Backspace on the keyboard to remove that part. Finally, after all the selections and deletions you will get something like the below image.
3. Use Pen Tool to make a selection inside the object.
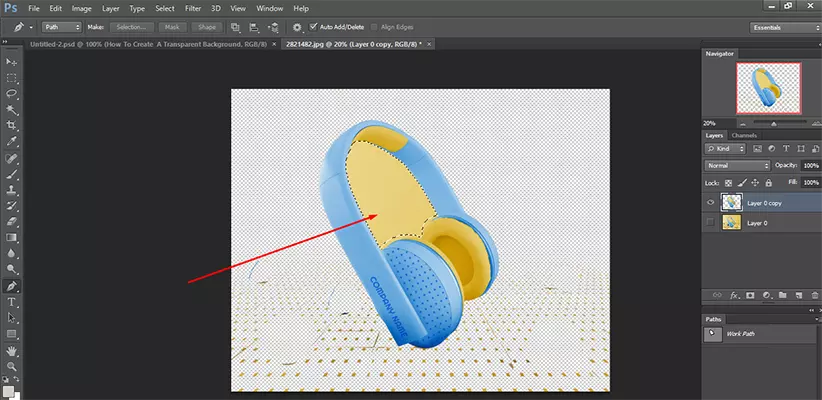
To remove the background inside the headphone, you can use the Pen Tool. Make a path inside the headphone by Pen Tool. Now right click on the path and select Make Selections. Press Delete to remove the background inside. As the background is removed, press Ctrl+D on the keyboard to deselect the selection.

You may also read: 11 Top Photoshop Tools For Beginners
4. Use the Eraser tool to clean off the pixelated parts.
Now you can use the Eraser Tool to remove the unwanted parts from the background and refine the edges if needed. This is actually a time-consuming process, but you will get good results from this. Zoom in the image to see the pixelated parts, and clean off the background as much as you wish. Zooming in allows you to have a closer look at the picture, which is really helpful in this case. Once the entire background is removed, you will get an image like the one below.
Finally, you will need to save the image in your desired format. But if you save it as a jpeg file, you will lose all the transparency. Rather save it as a PNG file if you want to keep the transparency. Go to File> Save As and select PNG from the drop-down menu. You should also save the file in PSD format for any future references and edits.
You may also like: How To Crop An Image In Photoshop
Conclusion
So in this tutorial, we have shared the process to create a transparent background on a subject that is moderate in difficulty. For more advanced background removal such as objects with furry or soft edges, please follow our blog. We will come up with new tutorials at a later time.


